I love making pannacotta, it is a really great light summery pudding. I have been meaning to experiment with different flavours of pannacotta for a while. Last summer I made a rather good passion fruit one but forgot to take a photo of it so never bothered blogging about it. This months Floral inspired Tea Time Treats spurred me on to attempt an elderflower variety. This recipe worked very well but remember that it only tastes as good as the elderflower cordial so don't scrimp on it. The recipe also specifies 2oz caster sugar but I prefer my pannacotta not too sweet so I only used 1oz.
Serves 6
3 sheets of gelatine
2oz caster sugar
100ml elderflower cordial
300ml double cream
300ml milk
Heat the milk and cream through gently but don't let boil. Add the sugar and stir until the sugar has dissolved. Soak the gelatine in warm water for a few minutes. Take the cream mixture off the heat and stir in the gelatine until it has completely melted. Add the elderflower cordial, stir and pour into six ramekins or moulds. Place in the fridge to set for a 3-4hrs it can easily be over night if you want to get ahead.
To release from the moulds dip them into warm water for a few seconds or run a pallet knife around the edge. Serve with soft fruit.
Showing posts with label Pudding. Show all posts
Tuesday, 29 May 2012
Friday, 11 May 2012
Jubilee lemon shortbread with raspberry buttercream.
When Fleur over at Home made by Fleur announced that she was running a baking competition for the Jubilee I could not resist entering. Every cooking magazine or blog had been suggesting reams of ideas for Jubilee baking.
However they mostly seem to be cupcakes, victoria sponges with different coloured layers, iced biscuits or cakes decorated with appropriately coloured soft fruit. Don't get me wrong there is nothing wrong with the above, but I wanted to make something a little different for the Jubilee. I have been reading lots of american food blogs recently, which have been advocating piped royal icing decorations onto sugar biscuits. There were two things which put me off making these kind of biscuits. Firstly though these look amazing but I am always worried about how good they actually taste, kids love them the more icing the better, but for adults I always feel people prefer a slightly more dignified icing to cake ratio. Secondly having been an art scholar I always end up wanting to pipe a design way beyond my piping skills. And this proved to be no exception to the rule as I chose to try to recreate the Diamond Jubilee logo.
I therefore had a cunning plan, I piped my royal icing designs onto clear plastic there by allowing me to trace my pattern rather than having to work free hand. Once they were dry I carefully pealed them off and stuck them onto of my shortbread with a thin layer of white chocolate. I was initially worried that the white chocolate would be too sweet but having conducted a taste test it actually brought out the lemon flavour in the biscuits.
To make royal icing you mix icing sugar with egg whites until you get the required consistency and then add food colouring. For large areas you need to outline the area with a thicker icing and then fill it in with a thinner consistency icing some times know as flood icing. I made these with the same consistency through out.
For the shortbread, this supposedly makes about 30 4cm circles and I got 24 squares out if it.
pinch of salt
225g butter
75g caster sugar
275g plain flour
75g semolina
1 lemon zest
Preheat the oven to 160C. Beat together the butter and caster sugar until it is light in colour and an even consistency.
Beat in the flour, salt, semolina and lemon zest, then knead with your hands to form a soft dough. Put in the fridge for about 30 minutes before rolling. It is easiest to work with when cold if you have shaped the dough into a pancake shape rather than a ball.
Roll out the shortbread dough until its about 1/2-1cm thick. Cut out as many biscuits as you can, re-rolling and re-cutting any trimmings as you go. Place on a couple of greased baking trays and bake in the oven for about 35-40 minutes until they turn lightly golden.
For icing
175g softened butter
350g icing sugar
1 1/2 tbsp lemon juice
1 1/2 tbsp of raspberry jam
However they mostly seem to be cupcakes, victoria sponges with different coloured layers, iced biscuits or cakes decorated with appropriately coloured soft fruit. Don't get me wrong there is nothing wrong with the above, but I wanted to make something a little different for the Jubilee. I have been reading lots of american food blogs recently, which have been advocating piped royal icing decorations onto sugar biscuits. There were two things which put me off making these kind of biscuits. Firstly though these look amazing but I am always worried about how good they actually taste, kids love them the more icing the better, but for adults I always feel people prefer a slightly more dignified icing to cake ratio. Secondly having been an art scholar I always end up wanting to pipe a design way beyond my piping skills. And this proved to be no exception to the rule as I chose to try to recreate the Diamond Jubilee logo.
I therefore had a cunning plan, I piped my royal icing designs onto clear plastic there by allowing me to trace my pattern rather than having to work free hand. Once they were dry I carefully pealed them off and stuck them onto of my shortbread with a thin layer of white chocolate. I was initially worried that the white chocolate would be too sweet but having conducted a taste test it actually brought out the lemon flavour in the biscuits.
For the shortbread, this supposedly makes about 30 4cm circles and I got 24 squares out if it.
pinch of salt
225g butter
75g caster sugar
275g plain flour
75g semolina
1 lemon zest
Preheat the oven to 160C. Beat together the butter and caster sugar until it is light in colour and an even consistency.
Beat in the flour, salt, semolina and lemon zest, then knead with your hands to form a soft dough. Put in the fridge for about 30 minutes before rolling. It is easiest to work with when cold if you have shaped the dough into a pancake shape rather than a ball.
Roll out the shortbread dough until its about 1/2-1cm thick. Cut out as many biscuits as you can, re-rolling and re-cutting any trimmings as you go. Place on a couple of greased baking trays and bake in the oven for about 35-40 minutes until they turn lightly golden.
For icing
175g softened butter
350g icing sugar
1 1/2 tbsp lemon juice
1 1/2 tbsp of raspberry jam
Beat the butter and icing sugar together until thoroughly mixed. Add in remaining ingredients. If you want a stronger colour you can add food colouring at this point.
To assemble cover the biscuits in white chocolate. If you need to assemble them a while before serving I would recommend icing both sides of the biscuits as this will stop the moisture from the filling making them sad. Next pipe a layer of buttercream, fill with fruit and complete with a second biscuit with a royal icing design on the top. I made larger ones as I used them as a pudding, I also trialled small ones which I stuck onto lolly pop sticks this worked equally well.
I have entered them into Fleurs Diamond Jubilee baking competition which she is running on behalf of Appliances Online.
Friday, 27 April 2012
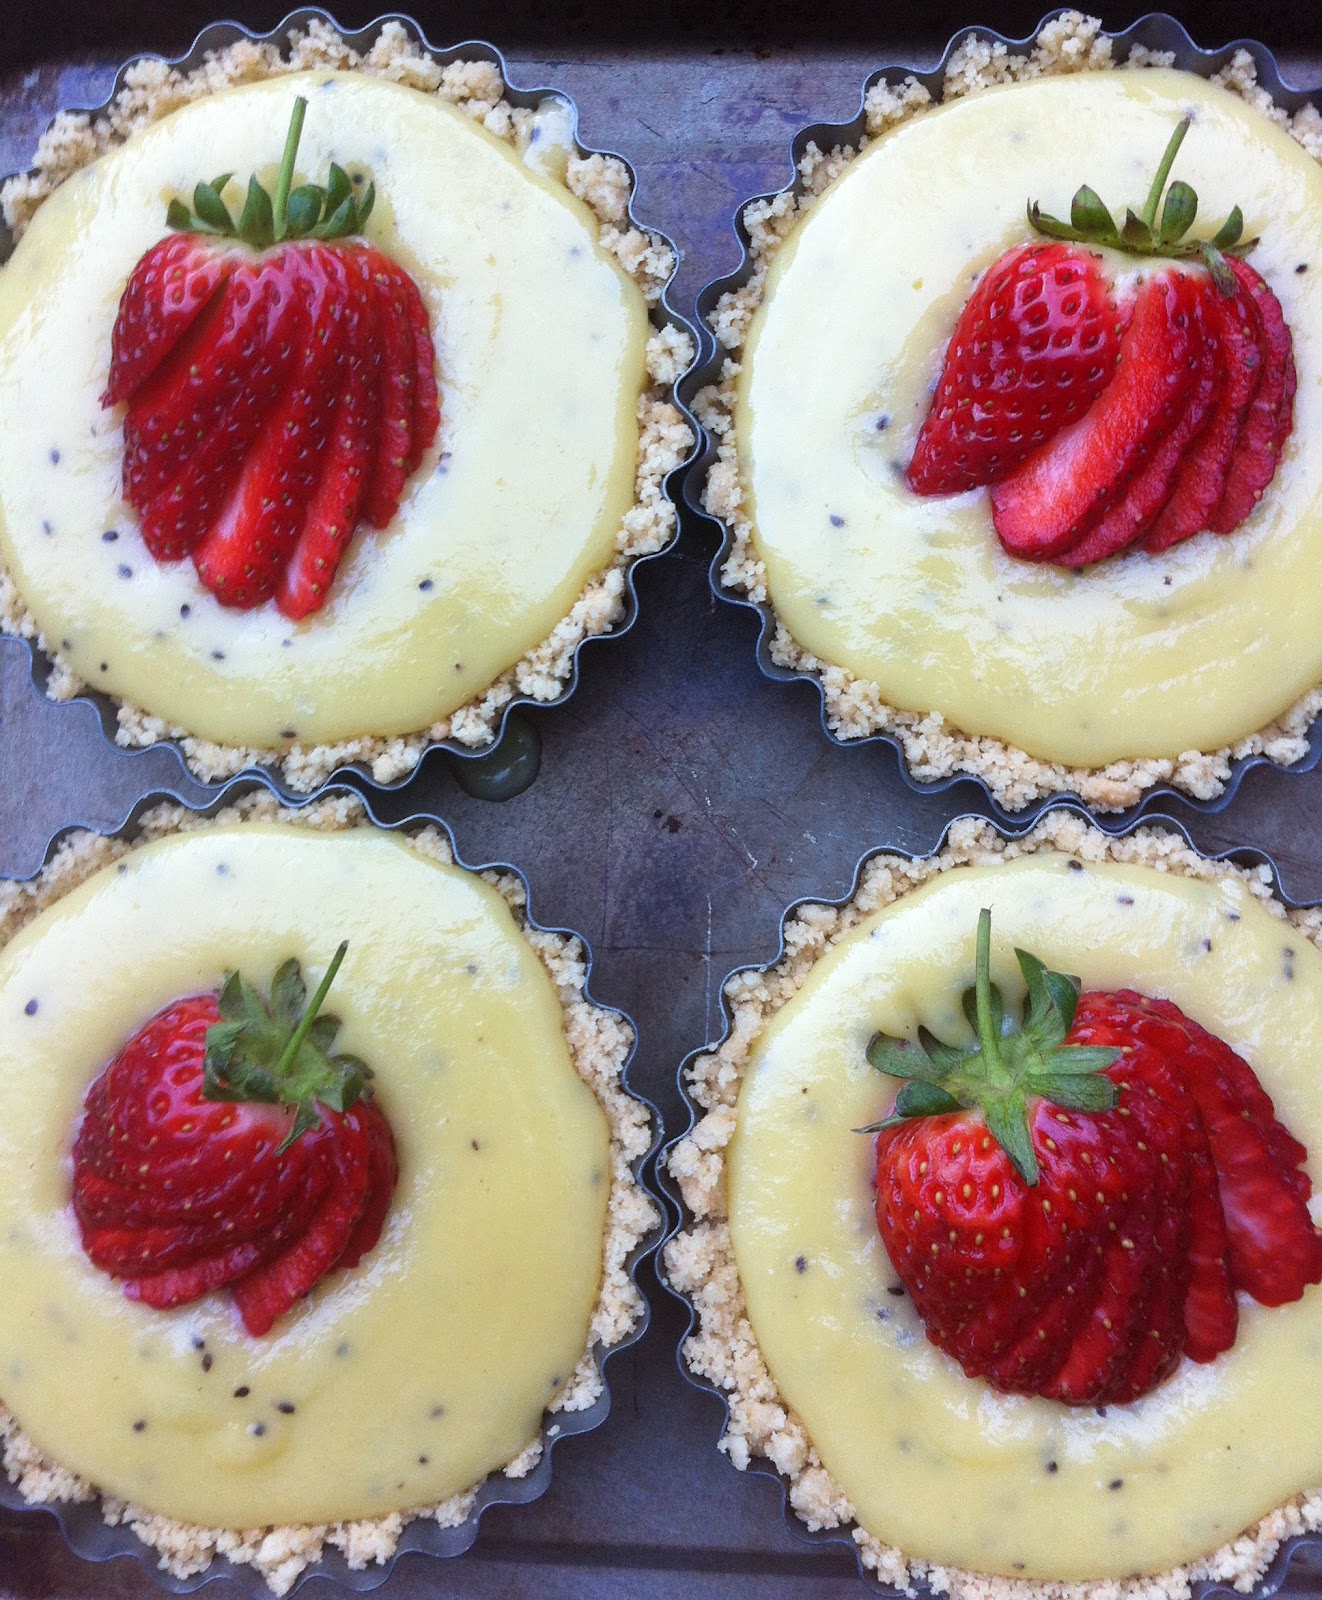
Strawberry and Kiwi Tarts.
I will admit that I hate kiwi but when I saw a picture of these I was so won over by the colours I had to try and make them. Despite not liking them personally I am reliably informed by the tasters present that this is a good recipe. I didn't bother with the food colouring if you want to see them with food colouring then have a look here Love and Olive Oil. Also I would suggest only putting the strawberries on top as you are about to serve as the colour from the fruit bleeds into the kiwi.
For base:
250g lemon biscuits
100g butter, melted
For filling:
4 kiwis pureed
1/2 cup caster sugar
1 1/2 tbsp lemon juice
3 eggs
3 egg yolks
100g butter
green food colouring, optional
Preheat oven to 175C. Break the biscuits up into a fine crumb, stir in melted sugar. Press the mixture into six individual tins or one 9inch tart tin. Bake for 4-5 minutes.
Put all filling ingredients into a heavy bottom pan and stir over a low heat for 10-15 minutes until the mixture has thickened. Don't let it boil. At this point add food colouring if desired. If the mixture has gone lumpy don't worry just put it through a sieve.
Divid the mixture amongst tins and leave in the fridge for 1-2 hours until set.
I have linked this up to Tinned Tomatoes Bookmarked Recipes.
Monday, 16 April 2012
Passion Fruit Souffle.
I usually indulge myself by introducing my recipes with some sort of uninteresting spiel about the history of or occasion surrounding the recipe. In this case I feel a picture says 1000 words and need I really say any more.
We used the recipe from the daily mail website by Daniel Bouluds he suggests making pear sauce to go with them which we didn't bother to make. If I were to make them again I think I would put a tablespoon of passion fruit curd in the bottom of each one or serve it with raspberry coulee.
4 large egg yolks.
60ml passion fruit juice it is about 8 passion fruit.
4 large egg whites.
25g (1oz) sugar, plus enough to dust the inside of the ramekins.
Preheat the oven to 190C. Butter the inside and rims of 4 x 175g (6oz) soufflé dishes, and then dust with sugar.
Whisk together the egg yolks and passion fruit and set aside. Whisk the egg whites until foamy, increase the speed and gradually add the sugar, beating until the whites form medium-stiff peaks. Fold the meringue into the yolk mixture.
Bake the soufflés for 15-20 minutes, until puffed and lightly golden. They should be firm with centres that are still a bit wobbly.
Saturday, 7 April 2012
Plum torte.
75g (3oz) soft butter
75g (3oz) caster sugar
100g (4oz) self-raising flour
1 tsp baking powder
2 large eggs
zest of 1 orange
900g (2lb) plums, cut in half, stones removed
About 150g (5oz) Demerara sugar
Pre heat oven to 200C or for two door aga bake on grid shelf on the floor of the roasting oven.
Generously butter a 28cm (11in) about 4cm (1½in) ovenproof dish or deep loose-bottomed flan tin.
Measure the first six ingredients into a large bowl and beat until smooth.
Spread this mixture evenly over the bottom of the tin or dish. It looks as if their is never going to be enough but trust me their is. Arrange the plums on top, cut side up and sprinkle with the Demerara sugar to form a thick layer. Bake for 30 minutes, until golden brown.
Sunday, 29 January 2012
Chocolate Whoopie Pies with Marshmallow Icing.
It is the musicians 21st birthday so she and a friend thought it would be a good idea to throw a party. Subsequently 60 bottles of cava have arrived in our flat to help the festivities along. Now an occasion such as this cannot pass by without cake, however, I have visions of 100 portions worth of cake crumbs being liberally spread around the flat not to mention the icing. I wanted something to make an impact when carried in with cake fireworks on the top so a tray bake or the like was out (this turned out to be a bad idea as the fireworks set off every smoke alarm in our flat). I contemplated cupcakes but they have been done now and only really look good when displayed on cake stands which we don't have. So I settled upon whoopie pies. These seem to be the new thing. If you have never heard of them before then the easiest way to describe them it that they are like the top half of two muffins sandwiched together with some form of icing.
I decided to make three different flavoured varieties chocolate, chocolate and peanut butter and red velvet. I am only going to write up the chocolate ones at the moment but I will make the other ones again at another time. I will say though that they batters of each of the three varieties behaved slightly differently.
I followed the basic recipes in the Hummingbird cake book but have deviated with the icing as I didn't want to have to spend a fortune on fluff for the filling. I made one batch of the icing following the recipe and must admit that it was the best. I do love fluff it is just that it is £2.40 a jar in England and each batch of icing needs a whole jar. My attempts to replace fluff with melted marshmallows needs some more experimentation I fear. I would also suggest trying the marshmallow icing from the Primrose book as an alternative.
The photos of the ones I made for the party aren't very good as I suddenly realised I hadn't taken any pictures just as we were about to sing happy birthday. They were such a success that I have had to make another batch this weekend as my flatmates didn't manage to get to them in time. I had been reading about new ideas for valentines day and thought that as I was having to make another batch anyway I might as well have a go at piping them into hearts. I also added pink food colouring to the icing. They looked fantastic if I say so myself and I would advise piping all whoopie pies in the future. They looked much neater and it was much easier than trying to spoon out a sticky batter.
I have entered them into Cake Boule valentine baking ideas and Valentines hearts ideas on very good recipes.
Ingredients: For the Sponge
1 large egg
150g (5.5ozs) Caster Sugar
125g (4.5ozs) Plain yoghurt
25ml (1fl oz) whole milk
¼ tsp vanilla essence ( I used nomu paste)
75g (2.5oz) melted unsalted butter
200g (7oz) Plain Flour
80g (3oz) Cocoa Powder
¾ tsp bicarbonate of soda
¼ tsp baking powder
Filling:
170g (6oz) unsalted butter
280g (10oz) icing sugar
220g (8oz) vanilla marshmallow fluff
Method:
Using a mixer cream the egg and sugar until fluffy. Pour the milk, yoghurt and vanilla essence into a bowl and mix together. Then add this mixture in with the beaten egg an sugar. Finally add in the melted butter and mix. Sift together the remaining dry ingredients, add them to the creamed mixture and mix well on a medium speed. Place the batter mix in the fridge to rest for 20-30 minutes this is important I don't know the science behind it but i imagine the raising agents are reacting and it changes the consistency of the batter. Pre-heat the oven to 170C Roasting oven with a cold shelf. Once rested, spoon or pipe onto the baking trays making 8-10 mounds per tray. These need to be 2-3 cm spaced apart and around 3 -5 cm in diameter. A tsp full is about the right amount if you are spooning.
Bake for 10-13 minutes or until they spring back when touched. Cool before filling.
To make the filling beat the butter and icing sugar together. Once this is blended add the marshmallow fluff and then mix on a high speed until the mixture is light and fluffy. Place in the fridge for 30 minutes as this will firm up the mixture slightly.
I made them the day ahead and they kept very well. They are quite robust so would travel well if need be I imagine they could be posted as well.
I have entered them into Cake Boule valentine baking ideas, Valentine Hearts ideas on very good recipes,Baked with love bakeoff and What Kate Baked's Tea Time Treats.
Wednesday, 18 January 2012
Devil's Food Cake.
Baking this cake was an opportunity to hit two birds with one stone so to speak. It meant that I could join in with a new virtual baking group the Weekly Bake Off and I could subtly gage the musicians reactions to the sponge before I adapt it for her 21st birthday. She has requested a light chocolate sponge layered with raspberry jam. So am thinking I will use this sponge as a cupcake base and ice it with raspberry marshmallow icing for which there is a recipe in the primrose bakery book. Anyhow back to the bake off the weekly bake off's host chooses one recipe every week from Mary Berry's 100 cakes and bakes which everyone uses and then we all post photos of our differing results. It never ceases to amaze me how you can have such varying results with everyone following the same recipe.
I will admit that mine was not the most proficient thing that I have ever made. One of the difficulties of baking in a student flat is that I rarely have the required ingredients or equipment. I managed to borrow the pair of sandwich tins off a friend. They were the seemingly clever ones with the twisty thing to cut the cake of the bottom of the tin. This was disaster two, despite greasing the tins they were resolutely stuck to the bottom. Disaster one involved the mixture overflowing all over the bottom of the over, which lets face it I haven't subsequently cleaned so every time we now use the oven the flat is filled with a pungent smell of burnt cake mixture. My third difficulty was a lack of either cream of tartar or a thermometer in order to make the icing. In the end the sponge was delicious, one I will definitely be using as a base for other cakes. The icing also worked well and looked very smart but it was far too sweet a combination with this sponge. I would suggest not to make the icing too far in advance as it was nicer when it was softer and more marshmallowy rather than the dry meringue texture which it took on the next day. It was also irritating that one egg whites worth of icing
was not quite enough but two was far to much. Found that if you gave the icing in the middle a couple of minutes to firm up before putting the top sponge on it gripped better.
For the cake:
55g cocoa powder
280g caster sugar
115g butter
2 eggs, lightly beaten
175g plain flour
1/4 teaspoon baking powder
1 teaspoon bicarbonate of soda
For the American frosting:
450g sugar
2 large egg whites
Preheat the oven to 180C.Grease and line 2 x 20cm sandwich tins.
Whisk the cocoa powder into 225ml water and set aside. Whisk the sugar and butter in a separate bowl until light and fluffy. Add in the eggs until well combined. Sift the flour, baking powder and bicarbonate of soda into a bowl.Alternately fold in the flour and the cocoa mixture to the butter mixture. Divide the batter evenly between the tins.Bake for 30 - 45 minutes until well risen and firm to touch.
To make the frosting, heat the sugar with 135ml water gently until the sugar has dissolved. Next, bring it to a boil and boil until it reaches 115C/240F on a sugar thermometer. The mixture will bubble and thicken. Whilst you are heating the sugar, whisk the egg whites until stiff. Once the sugar syrup is ready, allow the bubble to settle then pour slowly into the egg whites, whisking constantly. Continue whisking until the mixture stands in peaks.
Alternatively simply whisk the egg whites, sugar and a couple of tbsp of water together in a double boiler until you have the required consistancy.
Wednesday, 21 December 2011
Mince Pies.
When I was little I used to love making mice pies as they were one of the few things we actually made at christmas. My mother never bothered with a Christmas cake or pudding. However as an enterprising eleven year old I thought I would try and sell my mince pies one christmas. From an economic point of view this went very well unfortunately over 100 dozen later I never wanted to see another mince pie. I still make a few batches every year now but try to keep to to a minimum. In our house we have always made mini mince pies and I have two fantastic trays from the Pampered Chef. Each tray takes two dozen and a batch of my pastry should make four dozen or two trays worth. I would advise anyone to invest in this particular tray especially over the lakeland plastics one. The lakeland one is not non stick and the sides are so steep that it is often a nightmare to get the pies out without destroying them in the process. The pampered chef trays are still non stick despited being nearly ten years old and work every time.
Normally I would agree with the adage that you roll out sweet pastry in icing sugar rather than flour. But with mini mince pies while the sugar caramelising looks beautifully crispy and golden you cannot get them out of the tin in one piece.
I always use the same recipe for sweet pastry I'm not sure where it originally came from but it is now engraved on my brain I have made it so many times. I can't understand how people to seem to have such problems with pastry. To make this shortcrust pastry all you do is put everything in the magimix and turn in on.
Sweet Shortcrust Pastry
8oz Plain Flour
5oz Butter
2oz Icing Sugar
1 Egg Yolk
Zest of an Orange
2Tbsp Orange Juice
Pinch of salt
Put all the dry ingredients in the magimix and pulse until you have a bread crumb texture. If you don't have a blender rub the butter into the dry ingredients. Then add the egg yolk and enough orange juice to bring the pastry together into a dough. I would advise allowing it to chill in fridge for half an hour or so before rolling out as it will make it easier to work with.
If you are using this pastry for a summer tart you can use water and vanilla or lemon zest and juice.
I usually make my own mincemeat and then top this with pastry stars but this year I have been finishing up all sorts of odds and ends of mincemeat so thought I would try and add something new to my mince pies. I have read about topping mince pies with frangipani so thought I would give this a go.
Frangipani Topping
200g unsalted butter
200g caster sugar
200g ground almonds
50g flour
2 large eggs
2 tbsp brandy
Flaked almonds to decorate and icing sugar to dust
Beat butter until very soft, in food mixer with paddle attachment, gradually add sugar and ground almonds. Mix in flour, then eggs and lastly the brandy.
Fill casing with mincemeat then pipe the frangipani or smooth it on with a spoon. Sprinkle with flaked almonds. The ratio of frangipani to mince meat is totally up to you. I used the same amount of mince meat I usually use and then piped a thin layer of frangipani on top. This meant that the almond taste was not very strong but created a thin crisp layer on the top which sealed in the moisture.
Bake for about 25mins till golden brown and dust with icing sugar. The ones without the frangipani cook much quicker than the ones with it.
The recipe I followed was from Molly's Kitchen. I halved this quantity.
Sunday, 6 November 2011
Apple Tarte Tatin.
I made this for pudding last night as one of my flatmates little brothers is staying and she wanted to have some friends for supper so he could meet them. We don't have a metal handled frying pan in our flat which you need for this recipe as you have to pt the pan in the oven. So I improvised with a shallow Le Creuset pan, which worked well. The quantities are based on a 9inch pan I ended up using significantly more!
Ingredients:
Enough eating apples to fill you chosen pan once they have been peeled and cored. For a nine inch pan this will be about 6 medium sized apple.
4oz unsalted butter.
3/4 cup granulated sugar. I split this half and half with soft brown sugar as I had run out of granulated.
One packet of either puff or shortcrust pastry. If you are making it yourself this is about 8oz of flours worth of pastry. I used puff but I am reliably informed that shortcrust works just as well.
Peel, core, and quarter of the apples. Melt the butter in the pan and add the sugar stir until the two are combined but don't worry about waiting for the sugar to melt. Arrange the apples, however you wish but remember you serve it flipped out so what you will see is the surface touching the bottom of the pan. Don’t worry about the gaps peel more apples if you need to. Place the pan over medium-high heat until the liquid begins to bubble. After 15-20 minutes the juice from the apples will reduce and the caramel will become a deep golden colour. Don't worry if the caramel still looks very thin at this point it will thicken as it cools. Role your pastry out until it is slightly larger than the pan. Place it on top of the fruit and tuck the edges into the pan with a knife. Bake 25 to 30 minutes until the pastry is a golden colour at 180C of for the aga the bottom rung of the top oven but watch it as you may need to put a cold shelf in. Let the tart rest for 5 minutes before flipping it out, this lets the caramel thicken slightly so when you do flip it it doesn't run off the plate but sticks to your tart.
Friday, 4 November 2011
Chocolate Mousse Layer Cake.
It was my flatmates 21st this week and I wanted to make something slightly more interesting than sponge but did not have a huge amount of time on my hands. We also have one friend who is allergic to wheat and another nuts. So I decided to start with a chocolate roulade sponge in between which I would layer up different chocolate mousses. chocolate roulade of swiss role sponges are a great one to remember as they have no flour or fat in them.
Roulade:
175g/6oz plain chocolate.
175g/6oz caster sugar.
6 eggs, separated.
2 level tbsp cocoa, sieved.
33cm x 23cm (13in x 9in) Swiss roll tin I never use a tin instead I fold one out of baking parchment.
Preheat the oven to 180C/350F/Gas 4. Melt the chocolate slowly in a bowl over a pan of hot water. Allow to cool slightly. Place the sugar and egg yolks in a bowl and whisk with an electric whisk on a high speed until light and creamy. Add the cooled chocolate and stir until evenly blended. Whisk the egg whites in a large mixing bowl until stiff but not dry. Stir a large spoonful of the egg whites into the chocolate mixture, mix gently and then fold in the remaining egg whites, then the cocoa. Mixing in the spoonful of white may seem like a waste of air but it makes it easier to fold the rest together as the mixtures will now be a more similar constancy. Pour into the prepared tin and gently level the surface. Bake in the preheated oven for about 20 minutes until firm to the touch.
Chocolate mousse:
1oz dark chocolate
1 egg separated.
For the amount of sponge I had made I used 2oz and 2eggs. If I were to make this recipe again I would probably 1.5 times the sponge mixture and use three eggs. Not because there was not enough it easily fed 8-10, but because I was cutting it up to layer it. When you cut something down to size there is always an amount of wastage meaning the amount of sponge was quite tight. Melt the chocolate and allow to cool slightly. Then mix the egg yolks into the chocolate. In a separate clean bowl whisk the egg whites to a stiff peak. Fold the whites into the chocolate remembering to slacken off the chocolate as you did with the roulade. Normally you would now put the mixture into whatever you are going to serve it in and them into the fridge. If I were making this recipe for a pudding on its own the general rule is one egg and one ounce of chocolate per person.
White chocolate mousse:
90g white chocolate.
45ml milk.
1 egg white.
110ml double cream.
Melt the chocolate , stir in milk and set aside. This stops the chocolate ceasing. Whip the egg whites until stiff, then fold into the chocolate mixture until well combined.Whisk the cream until it forms soft peaks and gently fold into the chocolate mixture. This was a Nigella recipe which I had not used before it worked well for this as it was going with other dark chocolate components but it was far too sweet to be eaten on its own.
I assembled it by cutting the sponge into two squares and layering in up sponge, chocolate mouse, sponge and white chocolate mousse on the top. I had to cut squares as I had not made enough sponge but this would have been much easier to do if I had had enough to assemble it in the ring of a cake tin. I would have got a much neater finish as the mixture would have had straight sides. I also finished of the top with fresh raspberries. I will definitely make this again as a smart birthday cake or even just as a pudding. It is quite rich so is probably best served as a pudding rather than as a tea time cake. You could easily use orange chocolate for the mousse and brush grande marnier into the sponge if you wanted to make it a bit different.
Wednesday, 6 July 2011
Lemon and Raspberry Tarts.
The other day I bought a set of individual tart tins I really like individual puddings they instantly look so much smarter than something you have tried to cut up nicely. The problem with them is though that you do have to slightly alter recipes to fit the new dimensions both for quantities and cooking time. I had been meaning to try out Heston Blumenthal's lemon tart recipe as you don't have to bake the lemon mixture only the pastry cases. I have a habit of when blind baking, always either ending up with slightly uncooked pastry on the bottom or a burned rim. This therefore seemed an ideal solution and a good excuse to try out my new tins. I took them along as pudding for a picnic which they were perfect for. The quantity of pastry lined 10tins but the mixture only filled 8.
For the pastry I used my standard short crust pastry recipe which I use for everything.
Ingredients:
8oz Flour
5oz Butter
Zest of a lemon
2oz Icing sugar
An egg yolk
The juice of a lemon
Method:
For the pastry I used my standard short crust pastry recipe which I use for everything.
Ingredients:
8oz Flour
5oz Butter
Zest of a lemon
2oz Icing sugar
An egg yolk
The juice of a lemon
Method:
Put all the dry ingredients into a blender until you have a bread crumb texture. Then add the yolk and enough juice to bring the mixture together. Chill before working with. With small tins like these I don't bother rolling the pastry out I cut slices of a sausage shaped roll and push them together in the tin.
Ingredients:
3 Unwaxed Lemons
170g unsalted butter
220g caster sugar
5 Eggs
1 Egg yolk
Method:
Blind bake the pastry first. Put the butter and sugar into a pan with the juice, zest and eggs and place the pan over a medium heat. Stir continuously for 10-15 minutes (do not allow to simmer) until the butter has melted and the sugar has dissolved. Increase the heat to medium-high and stir until it begins to simmer; simmer for 5 seconds literally, then remove from the heat. Pass the mixture through a fine sieve into a bowl.You do actually do need to do this because the minute that you stop stirring the egg will start to scramble but the little lumps sieve out easily. Cover with clingfilm to avoid a skin forming, and place the bowl in the fridge to cool for 30 minutes.
When cold, pour the lemon filling into the centre of the tart allowing the lemon curd to flow evenly to the edges. Place in the fridge for at least 1 hour or until set. I also stuck raspberries onto the top as it was easier for a picnic rather than serving along side and having to use cutlery. In the end I would use the raspberries on the top again as the looked great.
Tuesday, 28 June 2011
Poached nectarines.
Left over from the parents day trip to france we have a tray of white nectarines that need dealing with before they go off so I decided to poach some in the bottle of rather nasty white wine which was left in the fridge. The flavour was very delicate as I was using white fruit but it would work equally well with yellow nectarines or peaches.
Ingredients:
180g caster sugar
1 orange
1/2 lemon
8 peaches, firm but ripe, white if possible
500ml water
500ml white wine, dry
1 vanilla pod
Method:
Split the vanilla pod in half lengthways and with the blade of a knife scrape the seeds. Cut the orange and lemon into fine slices 2 - 3mm, rind on. Peel the peaches and put them in a pan a single layer deep the peaches in a single layer. Add the caster sugar, water, white wine, vanilla pod halves and seeds. Top with orange and lemon slices. Cut out a round of greaseproof paper the same size as the saucepan and cut a hole in the centre to allow the excess heat to escape; place it directly on top of the peaches. On a high heat bring to the boil, immediately reduce the heat to a gentle simmer and cook for approximately 20 minutes. Turn off the heat and leave them to cool in their own juices. Serve cold.
Subscribe to:
Posts (Atom)